前言
之前写了一篇文章谈论 vue3 的新特性,然鹅……周一最近又 get 到了几个比较进阶的新特性,比如: vue2 用 watch , vue3 为什么用 watchEffect 。还有 vue3 为什么比 vue2 快, vite 为什么启动会非常快,以及 vue3 对全局注册 API 做出的重大改变。
一起来了解一波 vue3 新特性 📷
一、📗watch 和 watchEffect
1、watch 和 watchEffect 的区别
我们在 vue2 时,经常用 watch 来监听数据。但现在的 vue3 已经改用 watchEffect 来进行数据监听了。这两者具体有以下区别:
- 两者都可以监听
data属性变化; watch需要明确监听哪个属性;- 而
watchEffect会根据其中的属性,自动监听其变化。
2、举个例子
(1)wtach 监听
我们用 watch 来监听数据。具体代码如下:
<template>
  <!-- <p>watch vs watchEffect</p> -->
  <p>{{numberRef}}</p>
  <p>{{name}} {{age}}</p>
</template>

<script>
  import { reactive, ref, toRefs, watch, watchEffect } from 'vue';

  export default {
    name: 'Watch',
    setup() {
      const numberRef = ref(100);
      const state = reactive({
        name: 'monday',
        age: 18,
      });

      watch(
        numberRef,
        (newNumber, oldNumber) => {
          console.log('ref watch', newNumber, oldNumber);
        },
        {
          immediate: true, // 初始化之前就监听,可选
        }
      );

      setTimeout(() => {
        numberRef.value = 200;
      }, 1500);

      watch(
        // 第一个参数,确定要监听哪个属性
        () => state.age,

        // 第二个参数,回调函数
        (newAge, oldAge) => {
          console.log('state watch', newAge, oldAge);
        },

        // 第三个参数,配置项
        {
          immediate: true, // 初始化之前就监听,可选
          // deep: true // 深度监听
        }
      );

      setTimeout(() => {
        state.age = 25;
      }, 1500);
      setTimeout(() => {
        state.name = 'mondayLab';
      }, 3000);

      return {
        numberRef,
        ...toRefs(state),
      };
    },
  };
</script><template>
<!-- <p>watch vs watchEffect</p> -->
<p>{{numberRef}}</p>
<p>{{name}} {{age}}</p>
</template>
<script>
import { reactive, ref, toRefs, watch, watchEffect } from 'vue';
export default {
name: 'Watch',
setup() {
const numberRef = ref(100);
const state = reactive({
name: 'monday',
age: 18,
});
watch(
numberRef,
(newNumber, oldNumber) => {
console.log('ref watch', newNumber, oldNumber);
},
{
immediate: true, // 初始化之前就监听,可选
}
);
setTimeout(() => {
numberRef.value = 200;
}, 1500);
watch(
// 第一个参数,确定要监听哪个属性
() => state.age,
// 第二个参数,回调函数
(newAge, oldAge) => {
console.log('state watch', newAge, oldAge);
},
// 第三个参数,配置项
{
immediate: true, // 初始化之前就监听,可选
// deep: true // 深度监听
}
);
setTimeout(() => {
state.age = 25;
}, 1500);
setTimeout(() => {
state.name = 'mondayLab';
}, 3000);
return {
numberRef,
...toRefs(state),
};
},
};
</script>此时浏览器的显示效果如下:
综上,我们可以知道,当使用 watch 进行属性监听时,需要明确要监听哪一个属性,并且如果想要在初始化时就被监听,需要加上第三个可选参数 immediate:true 。这样看来,如果我们要监听多个属性时,那就要写很多个 watch ,属实有点麻烦。所以, vue3 就引进了 watchEffect 来解决这几个问题。
(2)watchEffect 监听
我们用 watchEffect 来监听数据。具体代码如下:
<template>
  <!-- <p>watch vs watchEffect</p> -->
  <p>{{numberRef}}</p>
  <p>{{name}} {{age}}</p>
</template>

<script>
  import { reactive, ref, toRefs, watch, watchEffect } from 'vue';

  export default {
    name: 'Watch',
    setup() {
      const numberRef = ref(100);
      const state = reactive({
        name: 'monday',
        age: 18,
      });

      watchEffect(() => {
        // 初始化时,一定会先执行一次(收集要监听的数据)
        console.log('numberRef', numberRef.value);
        console.log('state.age', state.age);
        console.log('state.name', state.name);
      });

      setTimeout(() => {
        numberRef.value = 2000;
      }, 1000);

      setTimeout(() => {
        state.age = 25;
      }, 1500);

      setTimeout(() => {
        state.name = 'mondayLab';
      }, 3000);

      return {
        numberRef,
        ...toRefs(state),
      };
    },
  };
</script><template>
<!-- <p>watch vs watchEffect</p> -->
<p>{{numberRef}}</p>
<p>{{name}} {{age}}</p>
</template>
<script>
import { reactive, ref, toRefs, watch, watchEffect } from 'vue';
export default {
name: 'Watch',
setup() {
const numberRef = ref(100);
const state = reactive({
name: 'monday',
age: 18,
});
watchEffect(() => {
// 初始化时,一定会先执行一次(收集要监听的数据)
console.log('numberRef', numberRef.value);
console.log('state.age', state.age);
console.log('state.name', state.name);
});
setTimeout(() => {
numberRef.value = 2000;
}, 1000);
setTimeout(() => {
state.age = 25;
}, 1500);
setTimeout(() => {
state.name = 'mondayLab';
}, 3000);
return {
numberRef,
...toRefs(state),
};
},
};
</script>此时浏览器的显示效果如下:
从上图中可以看到, watchEffect 只要做一次监听,就可以同时监听到三个属性。同时,值得注意的是, watchEffect 需要初始化,且初始化时一定会先执行一次,这个初始化的目的在于收集要监听的数据。所以,控制台打印的第一组数据就是初始化时的数据。
第一次收集到它要监听这三个属性后,在此之后呢,这三个属性也相应地拥有了响应式的功能。相对应的三个计时器再打印出三组数据出来,所以一共是四组数据。
二、📘setup 如何获取组件实例
(1)为什么需要获取组件实例
刚听到这个概念时,我其实时有点懵的。为什么要用 setup 来获取组件的实例?其实说的就是一个 this 的指向问题。
在 vue2 中, Options API 可以使用 this 来获取组件的实例,但是到现在的 vue3 ,已经被摒弃掉了。在 setup 和其他 Composition API 中没有 this ,但是它提供了一个 getCurrentInstance 来获取当前的实例。
(2)举个例子
我们先用 Options API 来获取实例。具体代码如下:
<template>
  <p>get instance</p>
</template>

<script>
  import { onMounted, getCurrentInstance } from 'vue';

  export default {
    name: 'GetInstance',
    data() {
      return {
        x: 1,
        y: 2,
      };
    },
    mounted() {
      console.log('this2', this);
      console.log('x', this.x, 'y', this.y);
    },
  };
</script><template>
<p>get instance</p>
</template>
<script>
import { onMounted, getCurrentInstance } from 'vue';
export default {
name: 'GetInstance',
data() {
return {
x: 1,
y: 2,
};
},
mounted() {
console.log('this2', this);
console.log('x', this.x, 'y', this.y);
},
};
</script>此时浏览器的显示效果如下:

正如我们所想的,用 options API ,具体的实例都可以如期的被调用出来。
下面我们用 Composition API 来看看,是否可以调用出来。具体代码如下:
<template>
  <p>get instance</p>
</template>

<script>
  import { onMounted, getCurrentInstance } from 'vue';

  export default {
    name: 'GetInstance',
    data() {
      return {
        x: 1,
        y: 2,
      };
    },
    setup() {
      //无法获取this实例
      console.log('this1', this);

      const instance = getCurrentInstance();
      console.log('instance', instance);

      onMounted(() => {
        //无法获取this实例
        console.log('this in onMounted', this);
        //通过getCurrentInstance获取this实例
        console.log('x', instance.data.x);
      });
    },
  };
</script><template>
<p>get instance</p>
</template>
<script>
import { onMounted, getCurrentInstance } from 'vue';
export default {
name: 'GetInstance',
data() {
return {
x: 1,
y: 2,
};
},
setup() {
//无法获取this实例
console.log('this1', this);
const instance = getCurrentInstance();
console.log('instance', instance);
onMounted(() => {
//无法获取this实例
console.log('this in onMounted', this);
//通过getCurrentInstance获取this实例
console.log('x', instance.data.x);
});
},
};
</script>此时浏览器的显示效果如下:
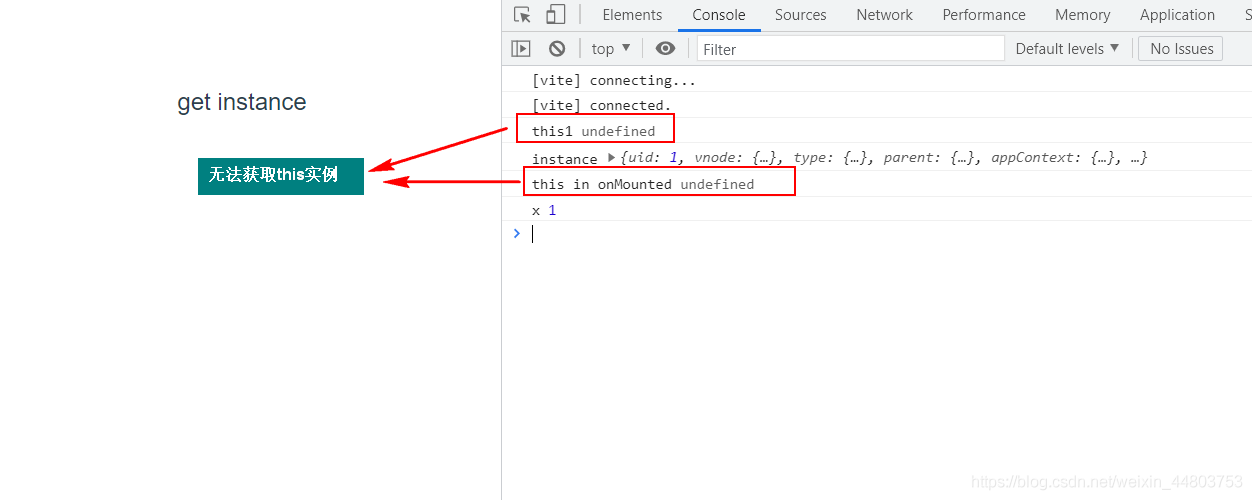
通过上图我们可以知道,如果用 Composition API 来获取组件实例,是没有办法获取的。需要通过 getCurrentInstance 方法来获取当前的组件实例。
三、📒 Vue3 为何比 Vue2 快
有一次看面经的时候发现有一道题:Vue3 为何比 Vue2 快。当时我也挺纳闷的,那个时候我的心里 🤯: vue3 的出现不就是因为更好才出现嘛?不是更好难道还能更差?
事实证明……是我孤陋寡闻了。 Vue3 比 Vue2 快的原因主要体现在以下 6 个方面:
- Proxy 响应式
- PatchFlag
- hoistStatic
- cacheHandler
- SSR 优化
- tree-shaking
接下来就让我们一起来了解一下吧 🙋
1、Proxy 响应式
vue3 中实现响应式的 Proxy 会比 vue2 中的 Object.defineProperty 快。具体原因可翻看我的另外一篇文章,这里不再讲述。
2、PatchFlag
(1)什么是 PatchFlag
- 在编译模板时,使用动态节点做标记;
- 标记,分为不同的类型,如
TEXT、PROPS;有的是直接获取text,有的则是修改props; diff算法比较时,可以区分静态节点,以及不同类型的动态节点。此处要注意的是,patchflag并不是专门对diff算法做优化,而是在输入上做一些变更和做一些标记,从而达到对diff算法的优化。
(2)举个例子 🌰
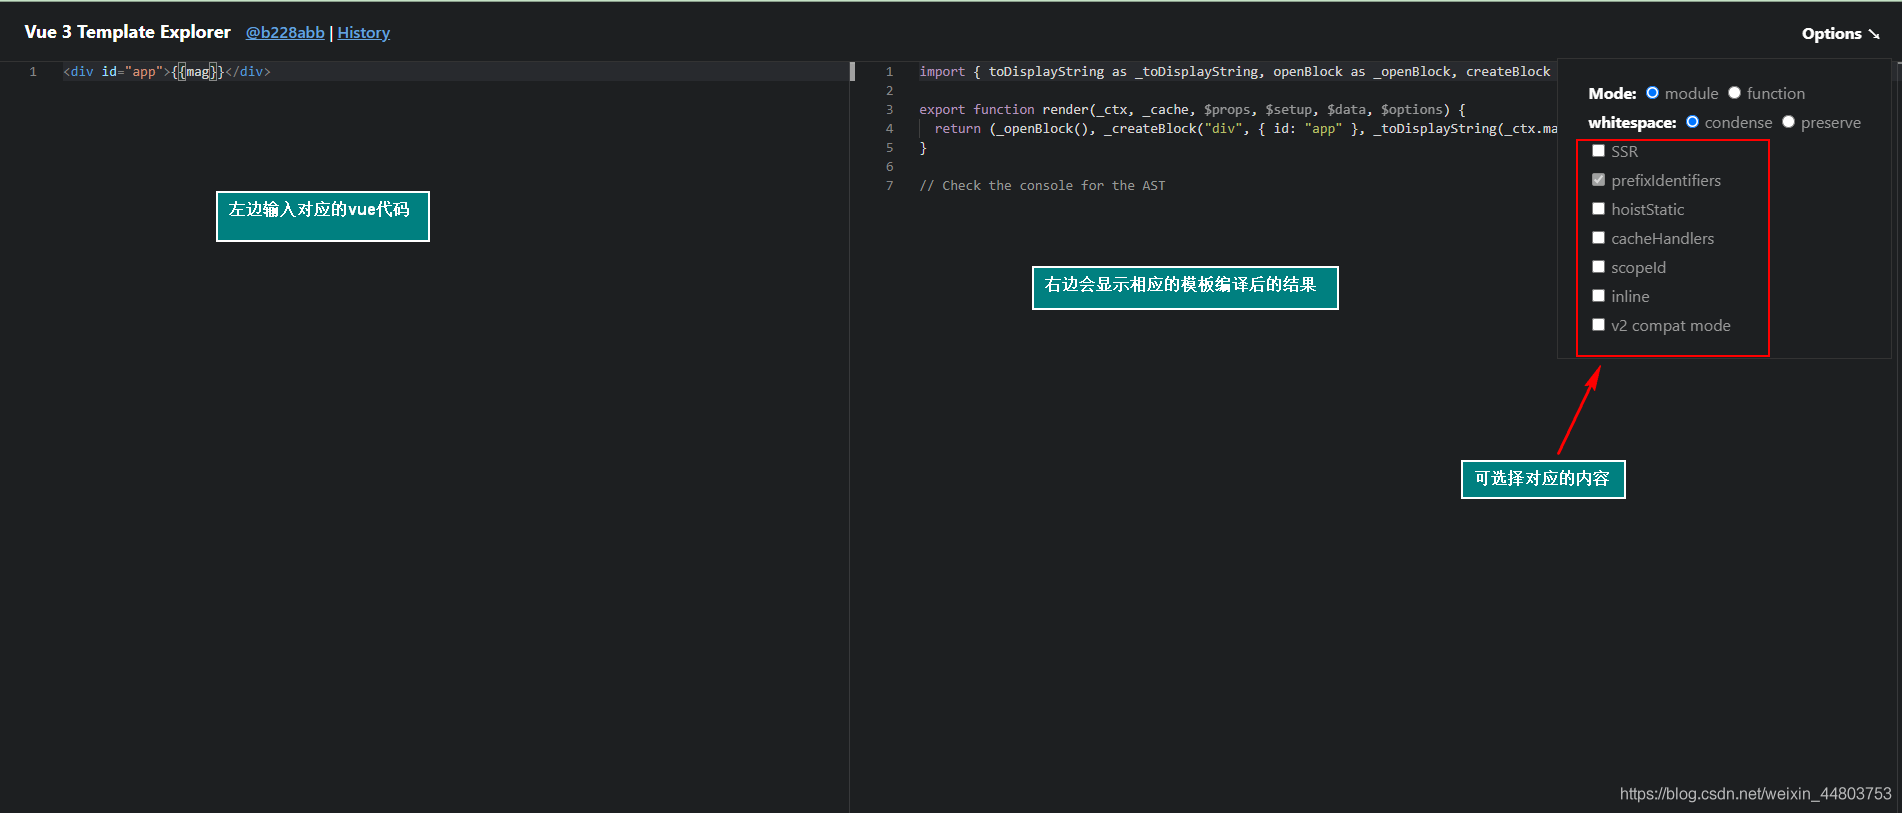
我们用一个在线网站来演示 patchflag ,在线网站网址为https://vue-next-template-explorer.netlify.app/,大家可以根据需要自行演示~
具体使用方式如下图所示:
接下来我们来演示 patchflag ,此时右边的 options 不做选择。我们在左边的框输入下面代码:
<div id="app">
  <span>hello vue3</span>
  <span>{{msg}}</span>
  <span :class="name">monday</span>
  <span :id="name">monday</span>
  <span :id="name">{{mag}}</span>
  <span :id="name" :msg="msg">monday</span>
</div><div id="app">
<span>hello vue3</span>
<span>{{msg}}</span>
<span :class="name">monday</span>
<span :id="name">monday</span>
<span :id="name">{{mag}}</span>
<span :id="name" :msg="msg">monday</span>
</div>此时右边的框显示如下:
import {
  createVNode as _createVNode,
  toDisplayString as _toDisplayString,
  openBlock as _openBlock,
  createBlock as _createBlock,
} from 'vue';

export function render(_ctx, _cache, $props, $setup, $data, $options) {
  return (
    _openBlock(),
    _createBlock('div', { id: 'app' }, [
      _createVNode('span', null, 'hello vue3'),
      _createVNode('span', null, _toDisplayString(_ctx.msg), 1 /* TEXT */),
      _createVNode('span', { class: _ctx.name }, 'monday', 2 /* CLASS */),
      _createVNode('span', { id: _ctx.name }, 'monday', 8 /* PROPS */, ['id']),
      _createVNode(
        'span',
        { id: _ctx.name },
        _toDisplayString(_ctx.mag),
        9 /* TEXT, PROPS */,
        ['id']
      ),
      _createVNode(
        'span',
        {
          id: _ctx.name,
          msg: _ctx.msg,
        },
        'monday',
        8 /* PROPS */,
        ['id', 'msg']
      ),
    ])
  );
}

// Check the console for the AST
import {
createVNode as _createVNode,
toDisplayString as _toDisplayString,
openBlock as _openBlock,
createBlock as _createBlock,
} from 'vue';
export function render(_ctx, _cache, $props, $setup, $data, $options) {
return (
_openBlock(),
_createBlock('div', { id: 'app' }, [
_createVNode('span', null, 'hello vue3'),
_createVNode('span', null, _toDisplayString(_ctx.msg), 1 /* TEXT */),
_createVNode('span', { class: _ctx.name }, 'monday', 2 /* CLASS */),
_createVNode('span', { id: _ctx.name }, 'monday', 8 /* PROPS */, ['id']),
_createVNode(
'span',
{ id: _ctx.name },
_toDisplayString(_ctx.mag),
9 /* TEXT, PROPS */,
['id']
),
_createVNode(
'span',
{
id: _ctx.name,
msg: _ctx.msg,
},
'monday',
8 /* PROPS */,
['id', 'msg']
),
])
);
}
// Check the console for the AST大家可以看到,除了第一个是静态节点以外,其他都是动态节点。此时模板编译后的结果,在最后边有对应的数字出现,这个数字就是标记。 vue3 通过给每个动态节点做数字标记,达到优化 diff 算法的效果。
3、hoistStatic
(1)什么是 hoistStatic
- 将静态节点的定义,提升到父作用域上,并缓存起来;
- 多个相邻的静态节点,会被合并起来;
- 典型的拿空间换时间的优化策略。
(2)举个例子 🌰
我们同样用在线网站来做一个演示。此时我们在左边框输入以下代码:
<div id="app">
  <span>monday</span>
  <span>monday</span>
  <span>monday</span>
  <span>{{msg}}</span>
</div><div id="app">
<span>monday</span>
<span>monday</span>
<span>monday</span>
<span>{{msg}}</span>
</div>此时右边的框显示如下:
import {
createVNode as _createVNode,
toDisplayString as _toDisplayString,
openBlock as _openBlock,
createBlock as _createBlock,
} from 'vue';
const _hoisted_1 = { id: 'app' };
const _hoisted_2 = /*#__PURE__*/ _createVNode(
'span',
null,
'monday',
-1 /* HOISTED */
);
const _hoisted_3 = /*#__PURE__*/ _createVNode(
'span',
null,
'monday',
-1 /* HOISTED */
);
const _hoisted_4 = /*#__PURE__*/ _createVNode(
'span',
null,
'monday',
-1 /* HOISTED */
);
export function render(_ctx, _cache, $props, $setup, $data, $options) {
return (
_openBlock(),
_createBlock('div', _hoisted_1, [
_hoisted_2,
_hoisted_3,
_hoisted_4,
_createVNode('span', null, _toDisplayString(_ctx.msg), 1 /* TEXT */),
])
);
}
// Check the console for the ASTimport {
createVNode as _createVNode,
toDisplayString as _toDisplayString,
openBlock as _openBlock,
createBlock as _createBlock,
} from 'vue';
const _hoisted_1 = { id: 'app' };
const _hoisted_2 = /*#__PURE__*/ _createVNode(
'span',
null,
'monday',
-1 /* HOISTED */
);
const _hoisted_3 = /*#__PURE__*/ _createVNode(
'span',
null,
'monday',
-1 /* HOISTED */
);
const _hoisted_4 = /*#__PURE__*/ _createVNode(
'span',
null,
'monday',
-1 /* HOISTED */
);
export function render(_ctx, _cache, $props, $setup, $data, $options) {
return (
_openBlock(),
_createBlock('div', _hoisted_1, [
_hoisted_2,
_hoisted_3,
_hoisted_4,
_createVNode('span', null, _toDisplayString(_ctx.msg), 1 /* TEXT */),
])
);
}
// Check the console for the AST通过以上代码可以发现, vue3 在每一个静态节点的外部都定义了父节点。这样看好像更冗余了一点,原因在于现在节点还比较少。
下面我们来演示更多的节点,此时右边的 options 选择 hoistStatic 。我们在左边框输入以下代码:
<div id="app">
<span>monday</span>
<span>monday</span>
<span>monday</span>
<span>monday</span>
<span>monday</span>
<span>monday</span>
<span>monday</span>
<span>monday</span>
<span>monday</span>
<span>monday</span>
<span>{{msg}}</span>
</div><div id="app">
<span>monday</span>
<span>monday</span>
<span>monday</span>
<span>monday</span>
<span>monday</span>
<span>monday</span>
<span>monday</span>
<span>monday</span>
<span>monday</span>
<span>monday</span>
<span>{{msg}}</span>
</div>此时右边的框显示如下:
import {
createVNode as _createVNode,
toDisplayString as _toDisplayString,
createStaticVNode as _createStaticVNode,
openBlock as _openBlock,
createBlock as _createBlock,
} from 'vue';
const _hoisted_1 = { id: 'app' };
const _hoisted_2 = /*#__PURE__*/ _createStaticVNode(
'<span>monday</span><span>monday</span><span>monday</span><span>monday</span><span>monday</span><span>monday</span><span>monday</span><span>monday</span><span>monday</span><span>monday</span>',
10
);
export function render(_ctx, _cache, $props, $setup, $data, $options) {
return (
_openBlock(),
_createBlock('div', _hoisted_1, [
_hoisted_2,
_createVNode('span', null, _toDisplayString(_ctx.msg), 1 /* TEXT */),
])
);
}
// Check the console for the ASTimport {
createVNode as _createVNode,
toDisplayString as _toDisplayString,
createStaticVNode as _createStaticVNode,
openBlock as _openBlock,
createBlock as _createBlock,
} from 'vue';
const _hoisted_1 = { id: 'app' };
const _hoisted_2 = /*#__PURE__*/ _createStaticVNode(
'<span>monday</span><span>monday</span><span>monday</span><span>monday</span><span>monday</span><span>monday</span><span>monday</span><span>monday</span><span>monday</span><span>monday</span>',
10
);
export function render(_ctx, _cache, $props, $setup, $data, $options) {
return (
_openBlock(),
_createBlock('div', _hoisted_1, [
_hoisted_2,
_createVNode('span', null, _toDisplayString(_ctx.msg), 1 /* TEXT */),
])
);
}
// Check the console for the AST此时可以看到, vue3 把所有的静态节点都包围成一个父节点了,就好像 vue3 跟它的甲方爸爸说,要不这样吧,我帮你做一个静态节点的集合,帮你把所有内容都定义到一起。
4、cacheHandler
(1)什么是 cacheHandler
cacheHandler,指缓存事件的意思。
(2)举个例子 🌰
我们同样用在线网站来做一个演示,此时右边的 options 选择 cacheHandler 。我们在左边框输入以下代码:
<div id="app">
<span @click="clickHandler"> monday </span>
</div><div id="app">
<span @click="clickHandler"> monday </span>
</div>此时右边的框显示如下:
import {
createVNode as _createVNode,
openBlock as _openBlock,
createBlock as _createBlock,
} from 'vue';
export function render(_ctx, _cache, $props, $setup, $data, $options) {
return (
_openBlock(),
_createBlock('div', { id: 'app' }, [
_createVNode(
'span',
{
onClick:
_cache[1] ||
(_cache[1] = (...args) =>
_ctx.clickHandler && _ctx.clickHandler(...args)),
},
' monday '
),
])
);
}
// Check the console for the ASTimport {
createVNode as _createVNode,
openBlock as _openBlock,
createBlock as _createBlock,
} from 'vue';
export function render(_ctx, _cache, $props, $setup, $data, $options) {
return (
_openBlock(),
_createBlock('div', { id: 'app' }, [
_createVNode(
'span',
{
onClick:
_cache[1] ||
(_cache[1] = (...args) =>
_ctx.clickHandler && _ctx.clickHandler(...args)),
},
' monday '
),
])
);
}
// Check the console for the AST观察代码 onClick: _cache[1] || (_cache[1] = (...args) => (_ctx.clickHandler && _ctx.clickHandler(...args))) 可以发现, vue3 在处理点击事件时,会进行缓存。这行代码的意思就是,当有 _cache[1] 的值时就取 _cache[1] ,如果没有 _cache[1] 就再给 _cache[1] 定义一个函数。
5、SSR 优化
(1)什么是 SSR 优化
- 静态节点会直接进行输出,绕过了
vdom; - 如果是动态节点,还是需要进行动态渲染。
(2)举个例子 🌰
我们同样用在线网站来做一个演示,此时右边的 options 选择 SSR 。我们在左边框输入以下代码:
<div id="app">
<span @click="clickHandler"> monday </span>
</div><div id="app">
<span @click="clickHandler"> monday </span>
</div>此时右边的框显示如下:
import { mergeProps as _mergeProps } from 'vue';
import {
ssrRenderAttrs as _ssrRenderAttrs,
ssrInterpolate as _ssrInterpolate,
} from '@vue/server-renderer';
export function ssrRender(
_ctx,
_push,
_parent,
_attrs,
$props,
$setup,
$data,
$options
) {
const _cssVars = { style: { color: _ctx.color } };
_push(
`<div${_ssrRenderAttrs(
_mergeProps({ id: 'app' }, _attrs, _cssVars)
)}><span>monday</span><span>monday</span><span>monday</span><span>${_ssrInterpolate(
_ctx.msg
)}</span></div>`
);
}
// Check the console for the ASTimport { mergeProps as _mergeProps } from 'vue';
import {
ssrRenderAttrs as _ssrRenderAttrs,
ssrInterpolate as _ssrInterpolate,
} from '@vue/server-renderer';
export function ssrRender(
_ctx,
_push,
_parent,
_attrs,
$props,
$setup,
$data,
$options
) {
const _cssVars = { style: { color: _ctx.color } };
_push(
`<div${_ssrRenderAttrs(
_mergeProps({ id: 'app' }, _attrs, _cssVars)
)}><span>monday</span><span>monday</span><span>monday</span><span>${_ssrInterpolate(
_ctx.msg
)}</span></div>`
);
}
// Check the console for the AST通过以上代码可以发现,用 SSR 来进行模板编译时,静态节点会直接进行输出,直接绕过 vdom 。而如果是动态节点时,依然需要进行动态渲染。
6、tree-shaking
(1)什么是 tree-shaking
- 编译时,根据不同的情况,引入不同的
API。
(2)举个例子 🌰
同样用在线网站来做一个演示,此时右边的 options 不做选择。左边框输入以下代码:
<div id="app">
  <span>monday</span>
  <span>monday</span>
  <span>monday</span>
  <span>{{msg}}</span>
</div><div id="app">
<span>monday</span>
<span>monday</span>
<span>monday</span>
<span>{{msg}}</span>
</div>此时右边的框的第一行显示如下:
import {
  createVNode as _createVNode,
  toDisplayString as _toDisplayString,
  openBlock as _openBlock,
  createBlock as _createBlock,
} from 'vue';
import {
createVNode as _createVNode,
toDisplayString as _toDisplayString,
openBlock as _openBlock,
createBlock as _createBlock,
} from 'vue';再来演示另外一种情况。同样我们在左边框输入以下代码:
<div id="app">
  <span :id="msg"></span>
  <input v-model="msg" />
</div><div id="app">
<span :id="msg"></span>
<input v-model="msg" />
</div>此时右边的框的第一行显示如下:
import {
  createVNode as _createVNode,
  vModelText as _vModelText,
  withDirectives as _withDirectives,
  openBlock as _openBlock,
  createBlock as _createBlock,
} from 'vue';
import {
createVNode as _createVNode,
vModelText as _vModelText,
withDirectives as _withDirectives,
openBlock as _openBlock,
createBlock as _createBlock,
} from 'vue';大家可以发现, vue3 在编译时,它不会一次性引入很多 API ,而是根据我们所需要的,我们要什么它就引入什么,我们不要的,它一概不会帮我们引入。这在某种程度上就优化了很多性能。
四、📚Vite 为什么启动非常快
第一次看见 vite 是在 vue3 的官方文档里面,官方文档介绍: vite 是一个 web 开发构建工具,由于其使用 原生ES模块 导入方式,可以实现闪电般的冷服务器启动。通过在终端中运行相应的命令,可以使用 Vite 快速构建 Vue 项目。
1、Vite 是什么
vite是一个前端的打包工具,是vue作者发起的一个项目;vite借助vue的影响力,发展较快,和webpack有着一定的竞争关系;- 优势:
vite使得程序在开发环境下无需打包,且启动非常快速。
2、Vite 为何启动快?
在开发环境下使用 ES6 Module ,无需打包,速度非常快;
在生产环境下使用 rollup 打包,并不会快很多。
3、ES Module 演示
(1)基本使用
在 vue2 时,我们加载一个工程文件需要先转为 ES5 ,然后经过一些列的打包才能正式加载项目页面。而在 vue3 ,生产环境目前还没有做到,但是在开发环境下,通过 ES6 Module 的方式,无需打包,速度非常快。
下面我们讲演示集中 ES Module 在浏览器中的应用。
(2)ES Module 在浏览器中的应用
1)基本演示
<!DOCTYPE html>
<html>
  <head>
    <meta charset="UTF-8" />
    <meta name="viewport" content="width=device-width, initial-scale=1.0" />
    <title>ES Module demo</title>
  </head>
  <body>
    <p>基本演示</p>

    <script type="module">
      import plus from './src/plus.js';

      const res = add(1, 2);
      console.log('add res', res);
    </script>

    <script type="module">
      import { plus, multi } from './src/math.js';
    </script>
  </body>
</html><!DOCTYPE html>
<html>
<head>
<meta charset="UTF-8" />
<meta name="viewport" content="width=device-width, initial-scale=1.0" />
<title>ES Module demo</title>
</head>
<body>
<p>基本演示</p>
<script type="module">
import plus from './src/plus.js';
const res = add(1, 2);
console.log('add res', res);
</script>
<script type="module">
import { plus, multi } from './src/math.js';
</script>
</body>
</html>我们在 <script> 标签下设置 type="module" ,之后就可以按照我们平常写 vue 程序一样,用 import 引入相应的文件。
2)引入外链
<!DOCTYPE html>
<html>
  <head>
    <meta charset="UTF-8" />
    <meta name="viewport" content="width=device-width, initial-scale=1.0" />
    <title>ES Module demo</title>
  </head>
  <body>
    <p>外链</p>

    <script type="module" src="./src/index.js"></script>
  </body>
</html><!DOCTYPE html>
<html>
<head>
<meta charset="UTF-8" />
<meta name="viewport" content="width=device-width, initial-scale=1.0" />
<title>ES Module demo</title>
</head>
<body>
<p>外链</p>
<script type="module" src="./src/index.js"></script>
</body>
</html>同时,也可以通过 src 的方式直接引入外部 js 文件。
3)远程引用
<!DOCTYPE html>
<html>
  <head>
    <meta charset="UTF-8" />
    <meta name="viewport" content="width=device-width, initial-scale=1.0" />
    <title>ES Module demo</title>
  </head>
  <body>
    <p>远程引用</p>

    <script type="module">
      import { createStore } from 'https://unpkg.com/redux@latest/es/redux.mjs';
      console.log('createStore', createStore);
    </script>
  </body>
</html><!DOCTYPE html>
<html>
<head>
<meta charset="UTF-8" />
<meta name="viewport" content="width=device-width, initial-scale=1.0" />
<title>ES Module demo</title>
</head>
<body>
<p>远程引用</p>
<script type="module">
import { createStore } from 'https://unpkg.com/redux@latest/es/redux.mjs';
console.log('createStore', createStore);
</script>
</body>
</html>也可以直接引入 cdn 上的网址,即远程引用。
4)动态引入
<!DOCTYPE html>
<html>
  <head>
    <meta charset="UTF-8" />
    <meta name="viewport" content="width=device-width, initial-scale=1.0" />
    <title>ES Module demo</title>
  </head>
  <body>
    <p>动态引入</p>
    <button id="btn1">load1</button>
    <button id="btn2">load2</button>

    <script type="module">
      document.getElementById('btn1').addEventListener('click', async () => {
        const add = await import('./src/add.js');
        const res = add.default(1, 2);
        console.log('add res', res);
      });
      document.getElementById('btn2').addEventListener('click', async () => {
        const { add, multi } = await import('./src/math.js');
        console.log('add res', add(10, 20));
        console.log('multi res', multi(10, 20));
      });
    </script>
  </body>
</html><!DOCTYPE html>
<html>
<head>
<meta charset="UTF-8" />
<meta name="viewport" content="width=device-width, initial-scale=1.0" />
<title>ES Module demo</title>
</head>
<body>
<p>动态引入</p>
<button id="btn1">load1</button>
<button id="btn2">load2</button>
<script type="module">
document.getElementById('btn1').addEventListener('click', async () => {
const add = await import('./src/add.js');
const res = add.default(1, 2);
console.log('add res', res);
});
document.getElementById('btn2').addEventListener('click', async () => {
const { add, multi } = await import('./src/math.js');
console.log('add res', add(10, 20));
console.log('multi res', multi(10, 20));
});
</script>
</body>
</html>比如说我们要给两个 button 绑定两个事件,并且要让他们引入两个不同的 js 文件,那我们可以在执行点击后,在箭头函数里面进行 import 操作,按需引入,即想要让它引入哪个再引入哪个。
五、📙 全局 API 修改
讲完 vite ,我们再来将一个 vue3 的重大改变,那就是全局 API 的修改。具体看下方。
1、Vue2 全局 API
在 Vue2 中,全局 API 经常会遇到以下问题:
- 在单元测试中,全局配置非常容易污染全局环境;
- 在不同的
apps中,共享一份有不同配置的Vue对象,也变得非常困难。
Vue2 入口文件写法:
import Vue from 'vue'
import App from './App.vue'

Vue.config.ignoredElements = [/^app-/]
Vue.use(/*...*/)
Vue.mixin(/*...*/)
Vue.component(/*...*/)
Vue.directive(/*...*/)

Vue.prototype.customProperty = () = {}

new Vue({
    render: h => h(App)
}).$mount('#app')
import Vue from 'vue'
import App from './App.vue'
Vue.config.ignoredElements = [/^app-/]
Vue.use(/*...*/)
Vue.mixin(/*...*/)
Vue.component(/*...*/)
Vue.directive(/*...*/)
Vue.prototype.customProperty = () = {}
new Vue({
render: h => h(App)
}).$mount('#app')2、Vue3 全局 API
(1)Vue3 新写法
因此, Vue3 为了解决 Vue2 的问题,推出了新的写法。具体代码如下:
Vue3 的新写法:
import { createApp } from 'vue'
import App from './App.vue'

const app = createApp(App)

app.config.isCustomElement = tag =>
tag.startsWith('app-')
app.use(/*...*/)
app.mixin(/*...*/)
app.component(/*...*/)
app.directive(/*...*/)

app.config.globalProperties.customProperty = () = {}

app.mount('#app')
import { createApp } from 'vue'
import App from './App.vue'
const app = createApp(App)
app.config.isCustomElement = tag =>
tag.startsWith('app-')
app.use(/*...*/)
app.mixin(/*...*/)
app.component(/*...*/)
app.directive(/*...*/)
app.config.globalProperties.customProperty = () = {}
app.mount('#app')(2)常见配置更新
1)全局配置:Vue.config->app.config
- config.productionTip 被删除
- config.ignoredElements 改名为 config.isCustomElement
2)全局注册类 API
- Vue.component -> app.component
- Vue.directive -> app.directive
3)行为扩展类 API
- Vue.mixin -> app.mixin
- Vue.use -> app.use
六、📮 结束语
到这里,碎碎念一波!在学习过程中,要明白 watch 和 watchEffect 的不同之处,还要知道 setup 如何获取组件实例,这其中谈论的就是关于 this 的问题。
最后的最后,就是 Vue3 为什么比 Vue2 快,涉及到6 个性能优化的方法,学有余力之余,尽量用在线网站演示一波。随之,紧跟着 vue3 的步伐, vite 也成为了很多开发人员在开发环境中使用的工具。还有就是,解决全局污染等各种问题, Vue3 对全局注册 API 做出的改变。
一波碎碎念结束, vue3 的进阶新特性讲解就结束啦!如有疑问欢迎提issue勘误~